Generating AI Videos Locally: Wan 2.2 on the Mac
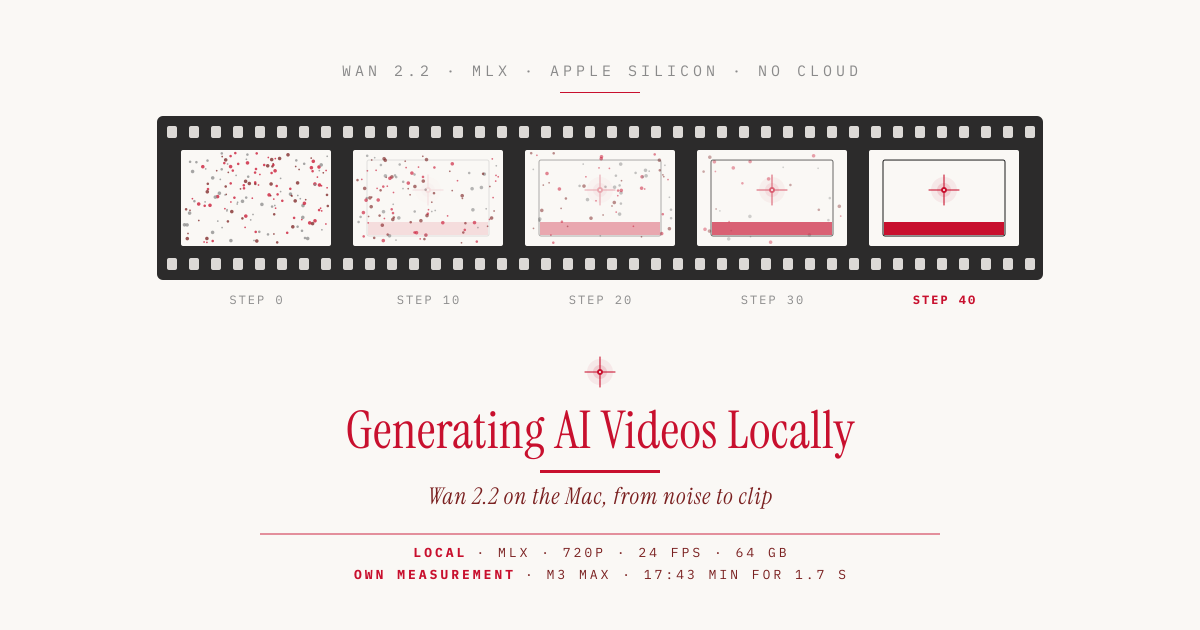
AI videos are still almost always made in the cloud. Sora, Veo and Runway take the prompt, compute on their servers and send the clip back, for a subscription fee and with everything you upload. Open video models change that. The weights of Alibaba’s Wan 2.2 are freely available, and on a Mac with enough memory the model runs entirely locally.
In this article we set this up together. We download the model, convert it for Apple’s MLX framework and use it to generate a video that is made entirely on our own machine. Then we bring readable text into the frame, and that is where local video generation currently hits its limit. All times were measured on a MacBook Pro with an M3 Max and 64 GB.
This is the clip we generate first, from a single sentence as the prompt:
A Mac with 64 GB and Wan 2.2
Our model is Wan 2.2, a family of open video models from Alibaba, and we use its smallest variant, Wan2.2-TI2V-5B with five billion parameters. TI2V stands for Text+Image-to-Video. The model generates a video from text or animates a start image we give it. It delivers 720p at 24 frames per second, with a native resolution of 1280×704 (model card).
On the Mac we compute with MLX, Apple’s machine learning framework for Apple Silicon. How MLX performs with language models is something we measured in Gemma 4 versus Qwen Coder. For Wan, mlx-video is a ready-made port that supports Wan 2.1, Wan 2.2 and LTX-2.
| What | Our test machine |
|---|---|
| Machine | MacBook Pro, M3 Max, 40 GPU cores, 64 GB |
| System | macOS 27.2 |
| Software | Python 3.12, MLX 0.32.3, mlx-video 0.0.1 |
| Download | 34.2 GB original weights |
| Converted for MLX | 23 GB |
| Memory while computing | 56.4 GB peak |
Memory is the real hurdle. A Mac with 64 GB is enough, one with 32 GB is not. For smaller machines mlx-video offers 4-bit or 8-bit quantization, which cuts the memory needed by the transformer considerably. On disk we need just under 60 GB for the download and the converted model. If your internal drive is short on space, put both on an external SSD.
Setup in three steps
First we create a working directory with its own Python environment and install mlx-video straight from the repo. We only need PyTorch because the conversion script reads the original weights in PyTorch format.
mkdir -p ~/lokales-video && cd ~/lokales-video
uv venv --python 3.12
uv pip install "mlx-video @ git+https://github.com/Blaizzy/mlx-video.git" torch
Next we download the model from Hugging Face. At 34 GB this takes a while, depending on the connection.
uvx --from huggingface_hub hf download Wan-AI/Wan2.2-TI2V-5B \
    --local-dir ~/models/Wan2.2-TI2V-5B
Finally we convert the weights to the MLX format:
.venv/bin/python -m mlx_video.models.wan_2.convert \
    --checkpoint-dir ~/models/Wan2.2-TI2V-5B \
    --output-dir ~/models/Wan2.2-TI2V-5B-MLX
The module path is mlx_video.models.wan_2, the project’s README still uses outdated names in a few places. If the conversion fails with a Metal timeout, we switch MLX to the CPU beforehand with mx.set_default_device(mx.cpu). The conversion only changes data types and does not need the GPU.
The first clip: 18 minutes for 1.7 seconds
Now we generate the video. One command is all it takes:
.venv/bin/python -m mlx_video.models.wan_2.generate \
    --model-dir ~/models/Wan2.2-TI2V-5B-MLX \
    --prompt "A fluffy orange tabby cat sits in front of a computer in a dark room, typing rapidly on a mechanical keyboard with its paws. Green code scrolls on the monitor and reflects on the cat's face. Cinematic lighting, shallow depth of field, hacker atmosphere." \
    --width 1280 --height 704 --num-frames 41 --steps 40 --seed 42 \
    --output-path katze.mp4
At 24 fps, 41 frames make 1.7 seconds. The seed is the starting value of the random number generator. The same seed and the same prompt produce the same video, so anyone who copies the commands exactly should get the clip from the beginning of this article. Our M3 Max took just under 18 minutes.
| Phase | Time (measured, M3 Max) |
|---|---|
| Load text encoder, encode prompt | 22.5 s |
| Load transformer | 10.3 s |
| Diffusion, 40 steps | 15:06 min |
| VAE decoding to final frames | 2:01 min |
| Total | 17:43 min |
Most of the time goes into diffusion. The transformer works the video out of pure noise in 40 steps, and each step takes 22.6 seconds here. Longer clips cost disproportionately more. With 121 frames for 5 seconds, a step takes about five times as long, because attention relates every image patch to every other one and therefore grows quadratically with length. A 5-second clip takes a good hour and a half on the M3 Max.
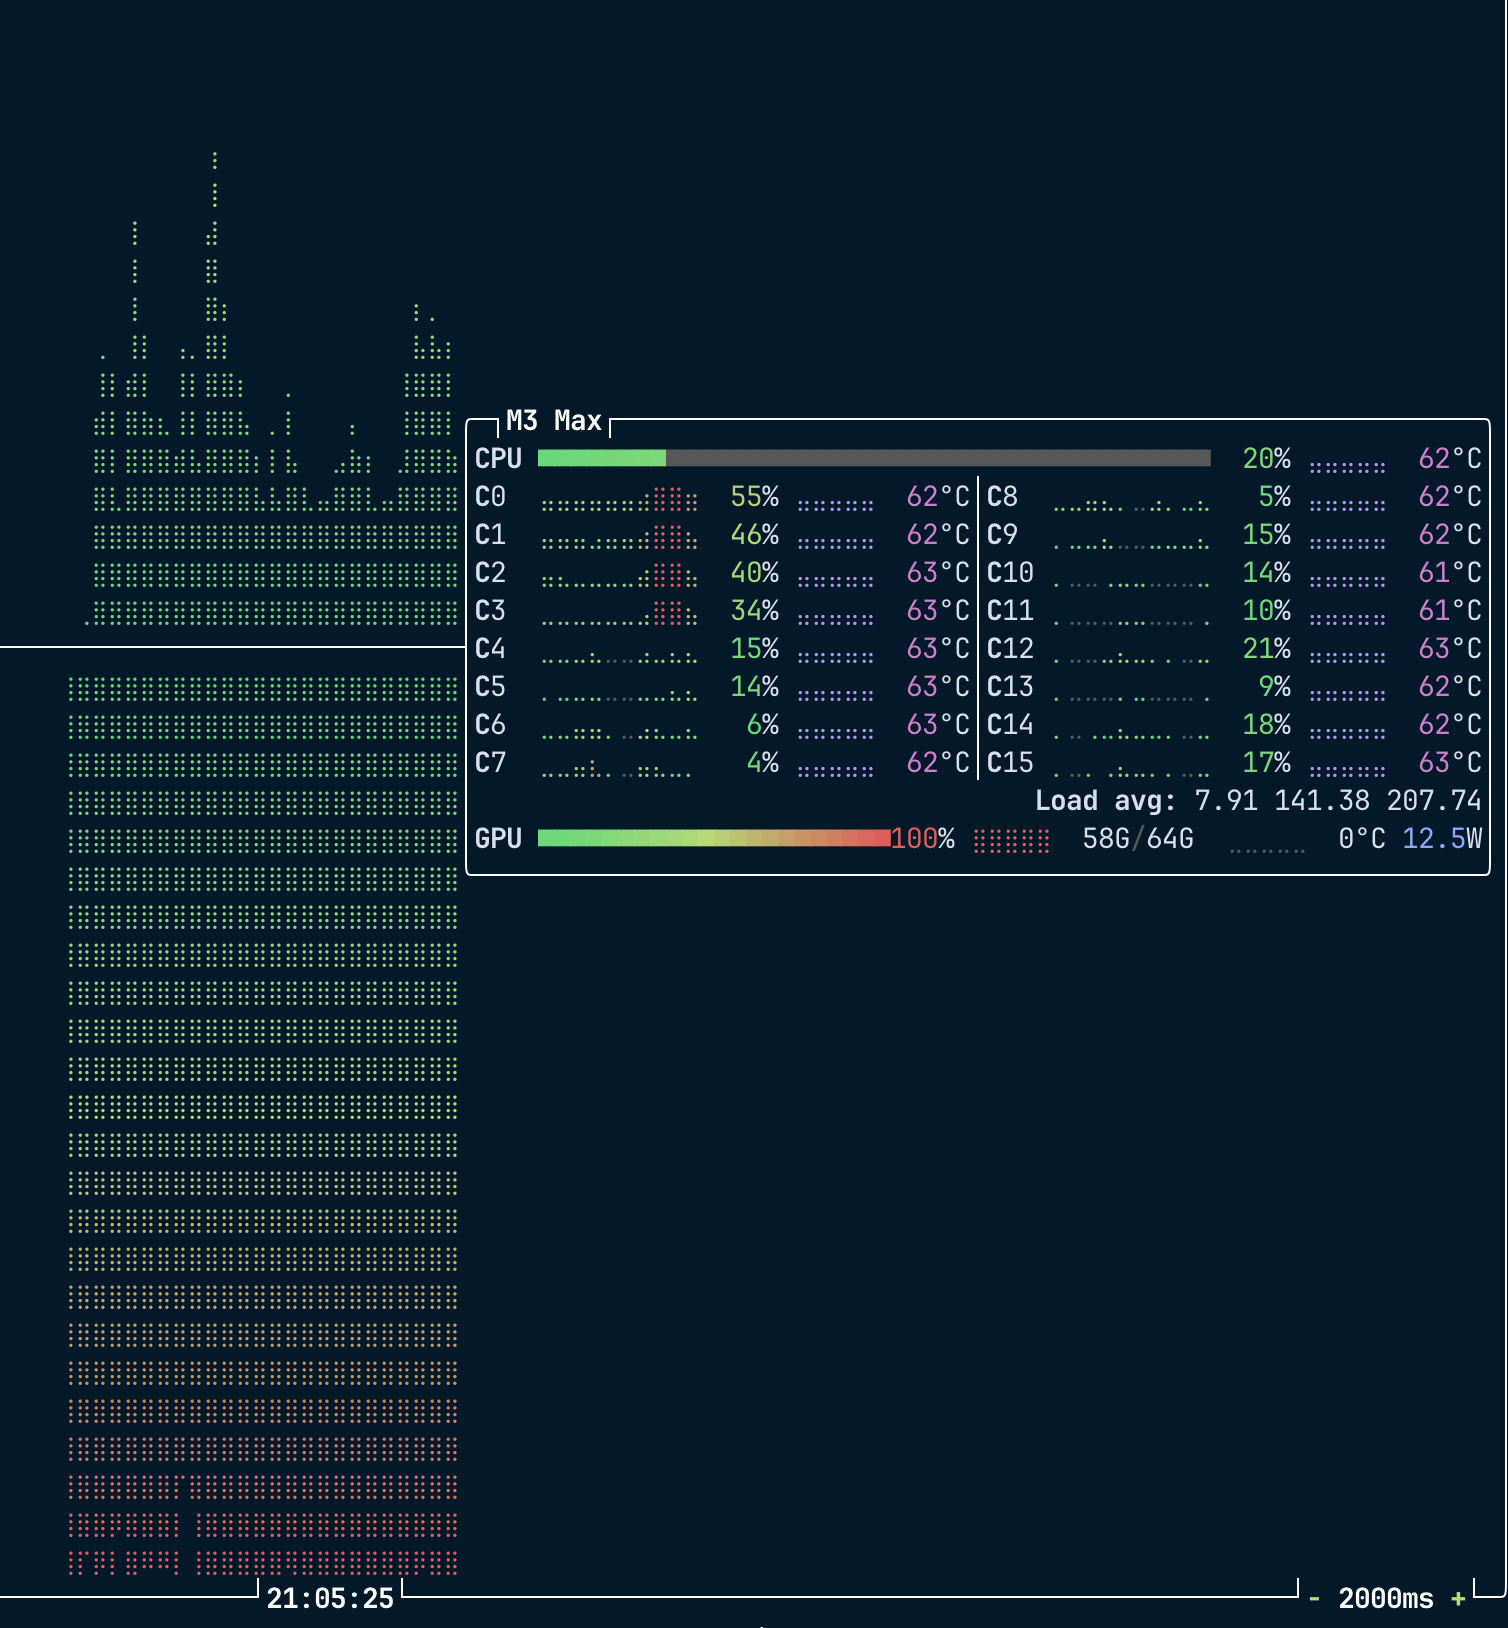
While diffusion is running, the Mac is fully loaded. The GPU sits at 100 percent the whole time, memory at 58 of 64 GB. The CPU, on the other hand, has little to do and stays at around 20 percent.

Before we start a run this long, a single frame with --num-frames 1 is worth it. It takes about two minutes and shows how Wan interprets the prompt.
PyTorch on the Mac: not enough memory
The other common route is PyTorch with the diffusers library, which ships a ready-made WanPipeline. On the Mac, PyTorch uses MPS, its Metal backend. We computed the same clip with it for comparison.
The diffusers script: katze_diffusers.py
import sys
import time

import torch
from diffusers import AutoencoderKLWan, WanPipeline
from diffusers.utils import export_to_video

MODEL = "Wan-AI/Wan2.2-TI2V-5B-Diffusers"
PROMPT = (
    "A fluffy orange tabby cat sits in front of a computer in a dark room, "
    "typing rapidly on a mechanical keyboard with its paws. Green code scrolls "
    "on the monitor and reflects on the cat's face. Cinematic lighting, "
    "shallow depth of field, hacker atmosphere."
)

device = "cuda" if torch.cuda.is_available() else "mps" if torch.backends.mps.is_available() else "cpu"
num_frames = int(sys.argv[1]) if len(sys.argv) > 1 else 41
steps = int(sys.argv[2]) if len(sys.argv) > 2 else 40

t0 = time.time()
vae = AutoencoderKLWan.from_pretrained(MODEL, subfolder="vae", dtype=torch.float32)
pipe = WanPipeline.from_pretrained(MODEL, vae=vae, dtype=torch.bfloat16).to(device)
pipe.vae.enable_tiling()
t1 = time.time()

video = pipe(
    prompt=PROMPT,
    width=1280,
    height=704,
    num_frames=num_frames,
    num_inference_steps=steps,
    guidance_scale=5.0,
    generator=torch.Generator("cpu").manual_seed(42),
).frames[0]
t2 = time.time()

out = f"katze-diffusers-{device}-{num_frames}f.mp4"
export_to_video(video, out, fps=24)
print(f"Device {device}, load {t1 - t0:.0f} s, generate {t2 - t1:.0f} s -> {out}")
| MLX | PyTorch/MPS | |
|---|---|---|
| Seconds per step | 22.6 | 28.6 |
| Diffusion, 40 steps | 15:06 min | 19:04 min |
| Peak memory | 56.4 GB | 75 GB, 95 GB with tiling |
| Video finished | yes | no |
PyTorch gets through diffusion a little more slowly and then fails on memory. While decoding the frames, the demand rose to 75 GB and macOS killed the process. enable_tiling(), which decodes the frames in tiles, did not help. mlx-video tiles the decoding on its own and stays below 64 GB. On the Mac we therefore stick with MLX. If you are following along on Linux with an Nvidia card, use the diffusers script, which picks cuda automatically there.
Readable text needs a start image
Wan turns motion, light and mood into video from a single sentence. Readable text, it does not. The monitor in our first clip shows pseudo-text, and it does not scroll.
We want to do better. The monitor should show real code, with a red status bar reading “rotecodefraktion” at the bottom. The obvious attempt is to write both into the prompt word for word. We tried that with a 5-second clip.
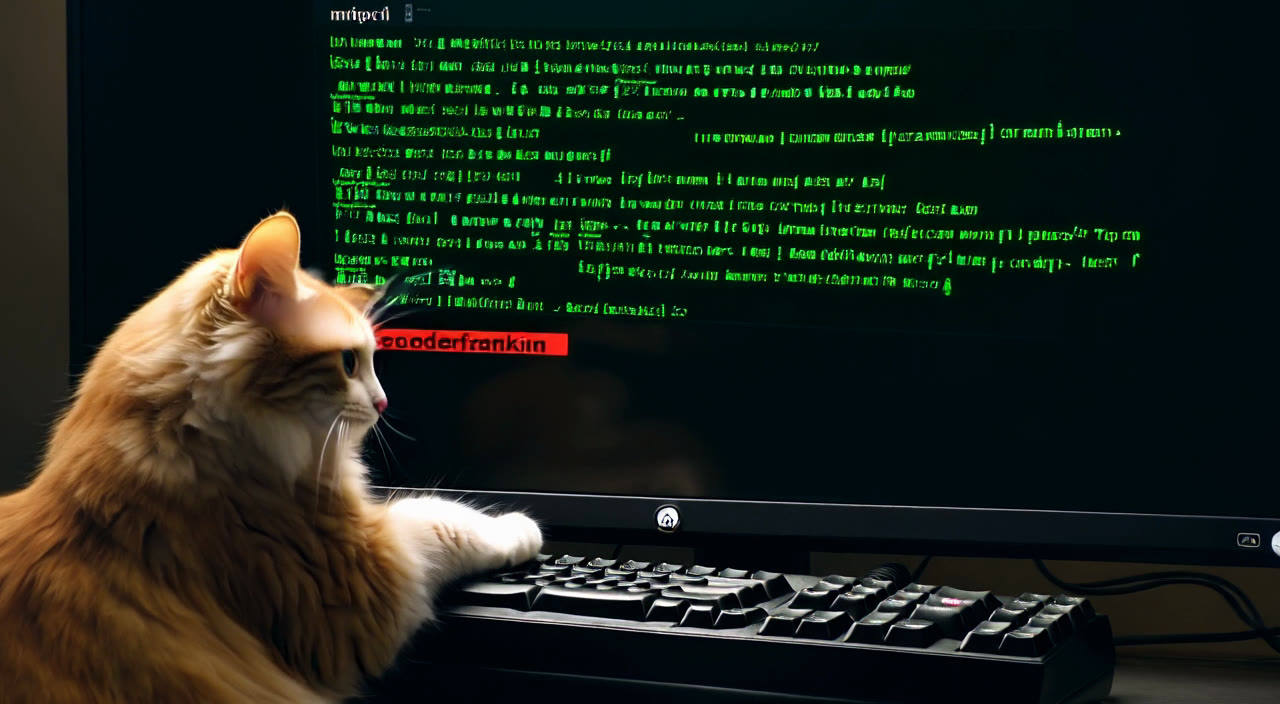
The result shows the limit clearly. The code is gibberish, and the bar is a small red label in the middle of the screen reading “coooderfrankin”. The lines are there from the first frame, nothing gets typed. Because the prompt was different, the whole scene is new as well. With different text, the same seed does not mean the same image.
Anything that should be readable in the video therefore belongs in the start image. That is exactly what TI2V is built for. We take the first frame of our first clip and put the real command we use to generate the videos on the monitor. We replace the green bar at the bottom of the screen with the red status bar.
First we extract the first frame from katze.mp4. mlx-video has already installed the imageio package:
.venv/bin/python -c "import imageio.v3 as iio; iio.imwrite('startbild.png', iio.imread('katze.mp4', index=0))"
A short Python script with Pillow does the rest. It draws the screen content, warps it in perspective onto the four corners of the monitor and leaves the cat’s pixels alone, so its ear stays in front of the screen.
The mockup script: mockup.py
"""Puts readable code and a red status bar on the monitor in the Wan preview frame."""
import sys

import numpy as np
from PIL import Image, ImageDraw, ImageFilter, ImageFont

SRC, OUT = sys.argv[1], sys.argv[2]
# Screen corners in the 1280x704 frame (top left, top right, bottom right, bottom left),
# status bar height in texture pixels and areas in front of the screen
SZENEN = {
    "seed42": dict(quad=[(424, 44), (1186, 36), (1172, 452), (442, 448)], bar_h=92, verdeckt=[]),
    "erstes": dict(quad=[(596, 112), (1140, 104), (1140, 438), (598, 440)], bar_h=118,
                   verdeckt=[(1022, 364, 1280, 704)]),
}
szene = SZENEN[sys.argv[3] if len(sys.argv) > 3 else "seed42"]
QUAD = szene["quad"]
W, H = 1532, 820  # screen texture at double resolution

CODE = [
    "$ python -m mlx_video.models.wan_2.generate \\",
    "    --model-dir Wan2.2-TI2V-5B-MLX \\",
    '    --prompt "hacker cat" \\',
    "    --width 1280 --height 704 \\",
    "    --num-frames 121 --steps 40 \\",
    "    --seed 42 \\",
    "    --output-path katze.mp4",
]

mono = ImageFont.truetype("/System/Library/Fonts/Menlo.ttc", 46)
bold = ImageFont.truetype("/System/Library/Fonts/Menlo.ttc", 52, index=1)

screen = Image.new("RGB", (W, H), (8, 18, 20))
d = ImageDraw.Draw(screen)
y = 70
for line in CODE:
    d.text((110, y), line, font=mono, fill=(90, 235, 120))
    y += 66
d.rectangle((110, y + 6, 136, y + 56), fill=(90, 235, 120))  # cursor
bar_h = szene["bar_h"]
d.rectangle((0, H - bar_h, W, H), fill=(200, 16, 46))
d.text((110, H - bar_h + (bar_h - 60) // 2), "rotecodefraktion", font=bold, fill=(255, 255, 255))
screen = Image.blend(screen, screen.filter(ImageFilter.GaussianBlur(3)), 0.35)  # slight glow


def coeffs(dst, src):
    """Coefficients for Image.transform(PERSPECTIVE) that map dst points to src points."""
    rows = []
    for (x, y), (u, v) in zip(dst, src):
        rows.append([x, y, 1, 0, 0, 0, -u * x, -u * y])
        rows.append([0, 0, 0, x, y, 1, -v * x, -v * y])
    return np.linalg.solve(np.array(rows, float), np.array(src, float).reshape(8))


base = Image.open(SRC).convert("RGB")
warped = screen.transform(
    base.size, Image.PERSPECTIVE, coeffs(QUAD, [(0, 0), (W, 0), (W, H), (0, H)]), Image.BICUBIC
)

quad_mask = Image.new("L", base.size, 0)
ImageDraw.Draw(quad_mask).polygon(QUAD, fill=255)
for box in szene["verdeckt"]:
    ImageDraw.Draw(quad_mask).rectangle(box, fill=0)
# Cat fur and whiskers stay in front (red well above blue, or bright); greenish is always screen
px = np.asarray(base).astype(int)
screen_px = (((px[..., 0] - px[..., 2]) < 30) & (px[..., 0] < 150)) | (px[..., 1] > px[..., 0] + 10)
mask = np.minimum(np.asarray(quad_mask), screen_px * 255).astype(np.uint8)
mask = Image.fromarray(mask).filter(ImageFilter.GaussianBlur(1))

Image.composite(warped, base, mask).save(OUT)
print(OUT)
We save it as mockup.py in the working directory and call it with the start image:
.venv/bin/python mockup.py startbild.png mockup.png erstes
The monitor corners are stored as coordinates in the script. They match the scene from our first clip. If your own prompt or seed produced a different scene, replace the four corner points with those of your monitor.
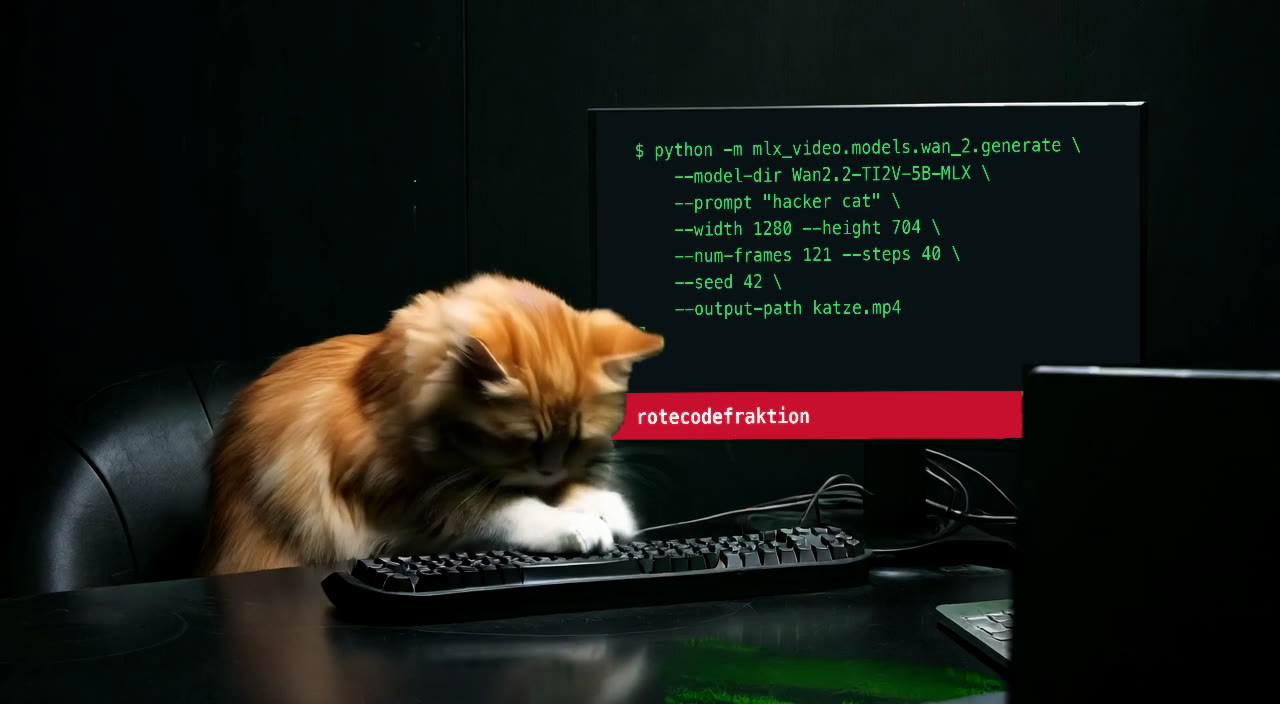
We give this image to Wan as the start frame. The prompt now only describes the motion:
.venv/bin/python -m mlx_video.models.wan_2.generate \
    --model-dir ~/models/Wan2.2-TI2V-5B-MLX \
    --image mockup.png \
    --prompt "The orange cat types rapidly on the keyboard with its paws and looks up at the monitor. The monitor shows a terminal with green code and a red status bar. Static camera, dark room, cinematic lighting." \
    --width 1280 --height 704 --num-frames 121 --steps 40 --seed 42 \
    --output-path katze-ti2v.mp4
The result is split in two. The status bar reading “rotecodefraktion” stays sharp and readable for all five seconds. The code, on the other hand, lasts exactly one frame. After barely two seconds Wan has dissolved it into pseudo-text, with only the line structure and indentation left. Large, short text survives the animation, small and dense text does not. Our Mac spent 96 minutes on this clip, with a peak memory of 57 GB.
The Neural Engine sits this one out
Every M chip has a Neural Engine, a dedicated AI accelerator. Wan leaves it unused. MLX and PyTorch compute on the GPU, the Neural Engine is only reachable through Core ML, and there is no Core ML version of Wan. There would not be much to gain anyway. The Neural Engine is built for efficient inference of smaller models, and for the large matrix computations of a video model the GPU with its 40 cores is the stronger unit.
Newer chips: a factor of four with the M5
With the M5, Apple put the lever in the right place. Every GPU core has its own Neural Accelerator for matrix computations, and MLX uses it. For image generation with FLUX, Apple states a factor of more than 3.8 over the M4 (Apple Machine Learning Research), and for the M5 Pro and M5 Max more than four times the GPU AI compute of the M4 Pro and M4 Max (Apple Newsroom). That is exactly what benefits diffusion, the expensive part of our run.
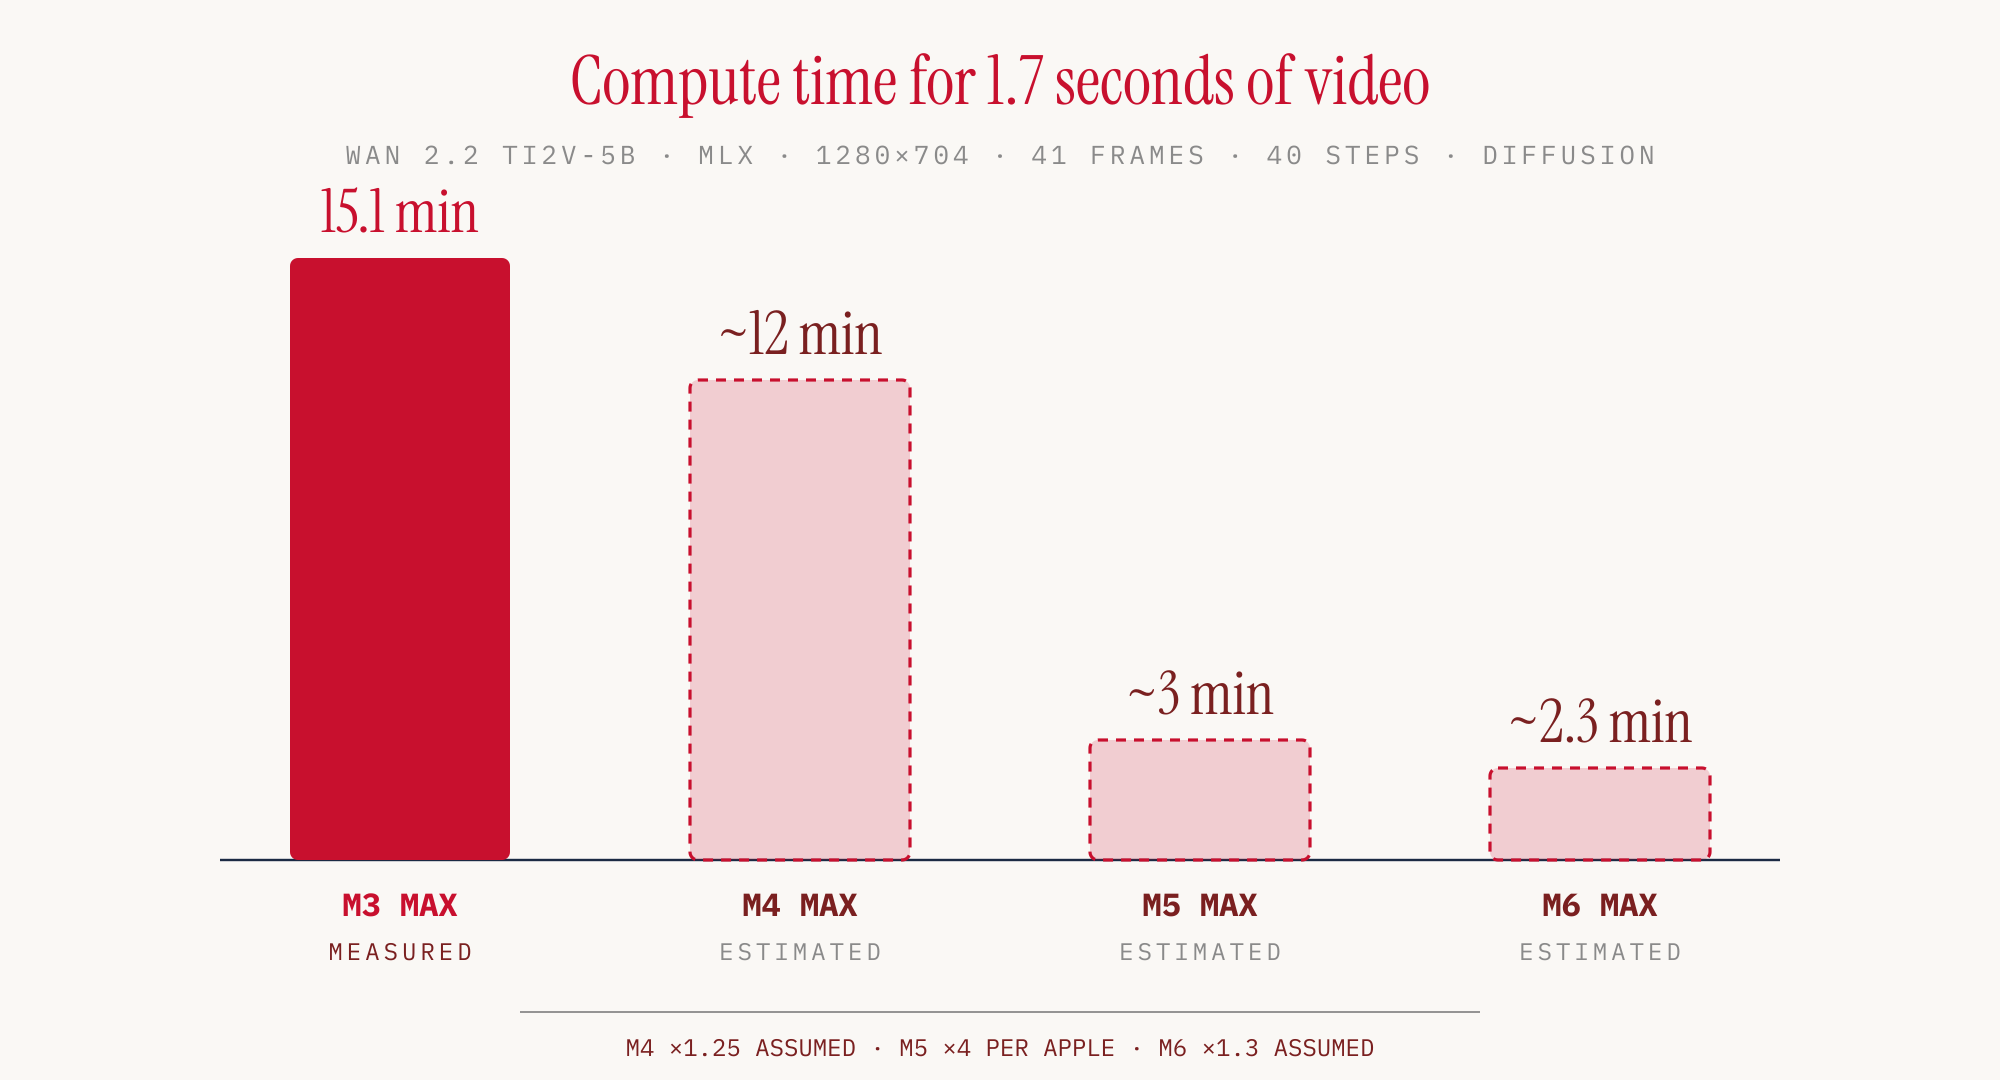
Only the M3 Max was measured. For the M4 Max and M6 Max we assumed a typical generational step each, for the M5 Max Apple’s factor of four. On an M5 Max the clip should therefore be done in about three minutes, and a 5-second video in about 20 minutes.
Conclusion
Yes, AI video generation works locally. A Mac with 64 GB, an open model and a handful of commands are enough for a 720p clip, without the cloud and without a subscription. On the M3 Max it takes patience, around ten minutes of compute per second of video for short clips. With the M5 that shrinks to a quarter.
The limit is text. Anything that should be readable in the video has to go in as the start image. Even then, only large lettering stays readable, and small code and fine details blur after two seconds.
The cat types. The writing is up to you.
Sources